Setting up ZedBoard and Running Linux Out of the Box
1. Connect 12V power to barrel jack (J20)
2. Connect the UART port of Zedboard (J14) to a PC using the MicroUSB cable.
3. Insert the included SD card into J12.
4. Turn power switch (SW8) to ON. Board will power on. Green “Power Good” LED (LD13) should illuminate.
5. Wait for ~15 seconds and the blue “Done” LED (LD12) should illuminate, and few more seconds later, a default image will be displayed on the OLED (DISP1).
6. Download and install the “Microsoft certified USB UART driver” from cypress.com for the product CY7C64225
7. Use device manager to identify the COM port corresponding to this USB-UART port. Open Putty and configure a serial connection with:
a. Baud rate of 115200
b. Data bits: 8
c. Parity: none
d. Stop bits: 1
e. Flow control: none
8. Cycle power by turning the power switch (SW8) from ON to OFF and then back ON.
9. In Putty window, a simple Linux image should boot with functionality.
10. The “poweroff” command switches off the zedboard
Demo 1: Interacting with GPIO switches and LEDs
Interacting with GPIO switches:
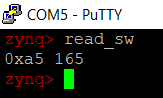
1. “read_sw” reads the status of the switches SW7-SW0. Source code for this script is in /usr/bin/
2. Flip the user switches to a value of your choice.
3. read_sw should give print this value in both hex and decimal.
Interacting with LEDs:
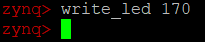
1. “write_led” writes the user LEDs (LD7-LD0). Source code for this script is in /usr/bin/
2. To see the value 0xaa displayed on LEDs, write_led 170 and the LEDs will light up accordingly.
Demo 2: Controlling OLED display
1. To power off the OLED display, run “unload_oled”. This will dynamically remove the OLED device driver module from the kernel and the OLED is powered off.

2. To power on the OLED display back, run “load_oled” script. This will dynamically insert the OLED device driver module to the kernel, load the source logo image and transfer it to the display device and the driver configures the display to show the logo.

Installation of Xilinx Vivado 15.1
1. Download Xilinx Vivado 15.1 from Xilinx archive
2. Follow steps listed here: http://www.zachpfeffer.com/single-post/Installing-20174-Vivado-and-SDK-on-Linux
One time setup stuff to enable proxy on Ubuntu Machine:
1. wget –no-proxy –no-check-certificate https://intelpedia.intel.com/images/8/88/Setup_intel_proxy.sh.zip
2. unzip Setup_intel_proxy.sh.zip
3. chmod +x setup_intel_proxy.sh
4. sudo ./setup_intel_proxy.sh
Add Vivado, Xilinx SDK, arm cross compiler etc to the path
1. export PATH=”/home/secoe/vivado/SDK/2015.1/gnu/arm/lin:$PATH”
2. export PATH=”/home/secoe/vivado/SDK/2015.1/gnu/arm/lib/bin:$PATH”
3. export PATH=”/home/secoe/vivado/Vivado/2015.1/bin:$PATH”
4. export PATH=”/home/secoe/vivado/SDK/2015/1/bin:$PATH”
5. export ARM_TOOLCHAIN_PATH=”/home/secoe/vivado/SDK/2015.1/gnu/arm/lin
Link gmake to make: ln -s /usr/bin/make /usr/bin/gmake
Getting Pulpino
Create a folder to clone Pulpino:
1. cd /home/secoe/Kanuparthi_stuff/
2. mkdir pulpino_buggy
3. cd pulpino_buggy
4. git clone https://github.com/pulp-platform/pulpino.git
5. Made changes to pulpino RTL by taking buggy_soc as reference
Synthesizing the RTL to generate Bitstream
Set few environment variables:
1. cd /home/secoe/Kanuparthi_stuff/pulpino_buggy/pulpino/fpga/
2. export BOARD=zedboard
3. export USE_ZERO_RISCY=0
4. In order to compile the RTL, to create the bitstream, first comment out the software part from the Makefile as this needs to be done manually to prevent running into proxy issues
a. #$.PHONY: sw
b. #sw:
c. # make -C sw all
d. # make -C sw clean
5. make
a. This step will take a while as the RTL is synthesized, and the bitstream is generated.
Cross Compiling Linux to Run on Zynq SoC
1. export PWD=”/home/secoe/Kanuparthi_stuff/pulpino_buggy/pulpino/fpga/sw
2. u-boot:
a. cd /home/secoe/Kanuparthi_stuff/pulpino_buggy/pulpino/fpga/sw
b. git clone https://github.com/Xilinx/u-boot-xlnx.git
c. cd u-boot-xlnx
d. git checkout tags/xilinx-v2015.1
e. cd ..
f. cd u-boot-xlnx
g. patch -p1 < ../u-boot-xlnx-def-env.patch
h. cd ../u-boot-xlnx
i. make CROSS_COMPILE=arm-xilinx-linux-gnueabi- zynq_zed_config
j. cd ..
k. cp ./u-boot.config ./u-boot-xlnx/.config
l. cd u-boot0xlnx
m. make CROSS_COMPILE=arm-xilinx-linux-gnueabi-
n. cd ..
o. mkdir -p sd_image
p. cp u-boot-xlnx/u-boot ./sd_image/u-boot.elf
3. Linux:
a. cd /home/secoe/Kanuparthi_stuff/pulpino_buggy/pulpino/fpga/sw
b. git clone https://github.com/Xilinx/linux-xlnx.git
c. cd linux-xlnx
d. git checkout tags/xilinx-v2015.1
e. cd ..
f. cp ./kernel.config ./linux-xlnx/.config
g. cd linux-xlnx
h. make ARCH=arm CROSS_COMPILE=arm-xilinx-linux-gnueabi- UIMAGE_LOADADDR=0x8000 uImage PATH=/home/secoe/Kanuparthi_stuff/pulpino_buggy/pulpino/fpga/sw/u-boot-xlnx/tools/:$PATH -j4
i. cd ..
j. mkdir -p sd_image
k. cp linux-xlnx/arch/arm/boot/uImage ./sd_image/uImage
4. Buildroot:
a. cd /home/secoe/Kanuparthi_stuff/pulpino_buggy/pulpino/fpga/sw
b. git clone https://git.busybox.net/buildroot
c. cd buildroot
d. git checkout tags/2015.05
e. cd ..
f. cat ./buildroot.config | sed ‘s#BR2_TOOLCHAIN_EXTERNAL_PATH=”/to/be/defined/”#BR2_TOOLCHAIN_EXTERNAL_PATH=”$(ARM_TOOLCHAIN_PATH)”#g’ > ./buildroot/.config
g. cd buildroot
h. make ARCH=arm CROSS_COMPILE=arm-xilinx-linux-gnueabi- busybox-source
i. cd ..
j. cp busybox.config buildroot/output/build/busybox-1.23.2/.config
k. cd buildroot
l. make ARCH=arm CROSS_COMPILE=arm-xilinx-linux-gnueabi- -j4
m. cd ..
n. mkdir -p sd_image
o. cp buildroot/output/images/rootfs.tar sd_image/rootfs.tar
5. Device tree blob
a. cd /home/secoe/Kanuparthi_stuff/pulpino_buggy/pulpino/fpga/sw
b. cd device-tree
c. ../linux-xlnx/scripts/dtc/dtc -I dts -O dtb -o ../sd_image/devicetree.dtb system.dts
6. FSBL
a. cd /home/secoe/Kanuparthi_stuff/pulpino_buggy/pulpino/fpga/sw
b. cp ../pulpemu/pulpemu.runs/impl_1/pulpemu_top.sysdef hsi/pulpemu_top.sysdef
c. cd hsi
d. hsi -mode tcl -source ./fsbl.tcl
e. cd ..
f. cp his/fsbl/executable.elf sd_image/fsbl.elf
7. Get Bitstream
a. cd /home/secoe/Kanuparthi_stuff/pulpino_buggy/pulpino/fpga/sw
b. cp ../pulpemu/pulpemu.runs/impl_1/pulpemu_top.bit sd_image/pulpemu_top.bit
8. BOOT.BIN
a. cd /home/secoe/Kanuparthi_stuff/pulpino_buggy/pulpino/fpga/sw
b. bootgen -image ./boot.bif -o i ./sd_image/BOOT.BIN -w on
Preparing the SD card:
1. Delete any existing partitions on the sd card using a tool such as gparted
2. Partition the sd card. Open fdisk for your sd card device:
a. fdisk /dev/sdX
b. Create a new partition table, type ‘o’ in the fdisk menu
c. Now create the partitions:
d. 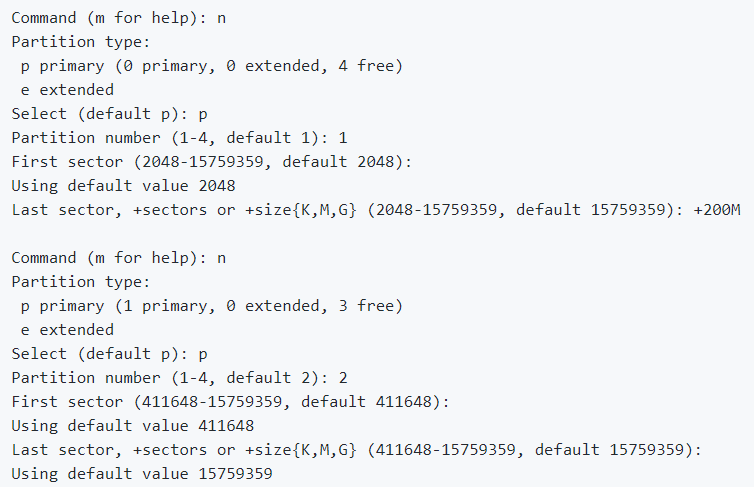
e. Now make the partitions bootable:
f.
g. Write the new partition table by typing ‘w’ in the fdisk menu
3. Create new file systems on the new partions:
a. mkfs.vfat -F 32 -n boot /dev/sdX1
b. mkfs.ext4 -L root /dev/sdX2
4. Mount the boot partition and put the boot images on there:
a. mkdir /tmp/boot
b. mount /dev/sdX1 /tmp/boot
c. cp /home/secoe/Kanuparthi_stuff/pulpino_buggy/pulpino/fpga/sw/sd_image/BOOT.BIN /tmp/boot/
d. cp /home/secoe/Kanuparthi_stuff/pulpino_buggy/pulpino/fpga/sw/sd_image/uImage /tmp/boot/
e. cp /home/secoe/Kanuparthi_stuff/pulpino_buggy/pulpino/fpga/sw/sd_image/devicetree.dtb /tmp/boot/
5. Mount the root partition and copy its contents
a. mkdir /tmp/root
b. mount /dev/sdX2 /tmp/root
c. cp /home/secoe/Kanuparthi_stuff/pulpino_buggy/pulpino/fpga/sw/sd_image/rootfs.tar /tmp/root
d. cd /tmp/root
e. tar -xvf rootfs.tar
f. cd ..
6. Unmount everything:
a. umount /tmp/boot
b. umount /tmp/root
7. Put the sd card in the zedboard
Installing the RI5CY GNU Compiler Toolchain
1. cd /home/secoe/Kanuparthi_stuff
2. git clone https://github.com/riscveval/ri5cy-gnu-toolchain
3. Install dependencies
a. sudo apt-get install autoconf automake autotools-dev curl libmpc-dev libmpfr-dev libgmp-dev gawk build-essential bison flex texinfo gperf libtool patchutils bc zlib1g-dev
4. cd ri5cy-gnu-toolchain
5. make
6. Add toolchain to path:
a. export PATH=/home/secoe/Kanuparthi_stuff/ri5cy_gnu_toolchain/install/bin/
Compiling Applications for Pulpino
If you need to write a new application, create a new folder with the application name at the same folder depth as the helloworld folder, i.e., create a new folder in …/pulpino/sw/
1. cd …/pulpino/sw/<applicationName>/
2. Create a file with the name CMakeLists.txt. This file should look like this:
a. If application consists of only one source file:
i. add_application(applicationName applicationName.c)
b. If application consists of more than one source files:
i. set (SOURCES main.c helper_fn1.c helper_fn2.c)
ii. add_application(applicationName, “${SOURCES}”)
3. mkdir build
4. cd build
5. cp …/pulpino_buggy/pulpino/sw/cmake_configure.riscv.gcc.sh .
6. Edit this file by defining the path to the RISCV GNU compiler toolchain and make changes such that the OBJDUMP, OBJCOPY, COMPILER, and RANLIB variables point to the correct location:
a. PATHVAR=…/ri5cy_gnu_toolchain/install/bin/
b. OBJDUMP=$PATHVAR/riscv32-unknown-elf-objdump
c. OBJCOPY=$PATHVAR/riscv32-unknown-elf-objcopy
d. COMPILER=$PATHVAR/riscv32-unknown-elf-gcc
e. RANLIB=$PATHVAR/riscv32-unknown-elf-ranlib
f. Adjust the PULP_GIT_DIRECTORY variable such that it points to the pulpino folder. For the folder structure followed here, adjust it as shown below:
i. PULP_GIT_DIRECTORY=../../../../
7. Run this script
a. ./cmake_configure.riscv.gcc.sh
b. make <applicationName>
c. This will create a file called spi_stim.txt (in a folder called slm_files). This file is located in the hierarchy (in the build/ folder). This file contains the RTL stimulus that needs to be applied to Pulpino for your application to run on bare bone Pulpino.
d. If you want to run simulations using ModelSim:
i. make <applicationName>.vsim.
ii. This starts ModelSim in GUI and shows all the relevant signals.
Running Applications on Pulpino in ZedBoard
1. Copy spiload application from VM to Host and to the Zedboard using scp (this application should already be loaded on the FPGA for you)
2. Copy the spi_stim.txt that was generated for your app to the zedboard using scp
3. ./spiload –timeout=30 spi_stim.txt
a. This will execute your applicationFme